Antiquely Support Centre
Welcome to the Antiquely support centre. You'll find easy to follow guides, help articles and troubleshooting tips.
If you need help with your account that requires additional assistance you can call us on +44(0)20 3580 5878. We are available Mon-Fri between 09:00-17:00 UK time, if we miss you leave us a message and we'll call you back.
Updating Account Details and Password
-
Update your account details
-
Change your password
Update your account details
In the ‘Settings’ tab you can update your account details such as the name of the account holder, email address of the account holder, and the store name. These can be changed by clicking on the text field and entering new information. Once you have updated your details click the ‘Save’ button to save your changes.
Change your password
You can update the password to your Antiquely account by navigating the settings tab. Click the password field and you will be asked to enter your email address; enter the same email address as the account holder. You will be sent a code from no-reply@antique-ly.com, enter the code when prompted and then a new password.

Setting Up and Managing Your Subscription
-
Subscribing to Antiquely Essentials on a desktop computer
-
Managing your subscription on a desktop computer
Subscribing to Antiquely Essentials on a desktop computer
To use all features of Antiquely such as adding items to your basket, you will need to subscribe to Antiquely 'Essentials'. You can subscribe by navigating to the settings tab on a desktop computer in your web browser and clicking 'Manage Subscription' in the top right corner of the screen. The subscription is £39.99 per month, the first payment will be taken once you click 'pay £39.99' and will begin your rolling monthly subscription. We offer a 30 day free trial to new customers; please contact us to find out more on info@antique-ly.com
You will be able to cancel the plan at any time. You can see full Terms of Service here: https://www.antique-ly.com/terms-conditions
Managing your subscription on a desktop computer
Once you have subscribed to Antiquely Essentials you can manage your subscription at any time by navigating to the Settings tab from your homepage on a desktop computer via your web browser. Next, click the button 'Manage Subscription' and you will be prompted to input your email address; use the same one you used to sign-up to Antiquely. You will then receive an email with a link to your custom portal where you can log-in to cancel your current plan or update your credit card details. When you cancel the plan your account will remain active until the end of the billing term.
If you would like to resume your subscription you can go back to your custom portal and click 'Renew'.
Adding and Managing a List of Dealers
-
Adding a New Dealer
-
Editing or Updating a Dealer’s Details
Adding a New Dealer
Adding a list of vendors to the Antiquely App is the first step to getting started. You can add a new dealer and input their details by clicking the 'Add Dealer' button in the top-right corner of the home page.
You can then input the details of the vendor. Below is a table describing each of the input fields. All fields are required when adding a new dealer.
Updating or Deleting a Dealer's Details
You can update a dealer's information at any time by clicking on the pen icon next to the dealer's name on the homepage. Update any of the fields and then click 'update dealer' to save your changes. Any changes you make will be automatically updated on the sales ledger reports and reflected on future email reports.
You can also update whether they receive email reports using the 'Auto reporting' toggle. Make sure you click 'update dealer' to save your changes.
You can also delete a dealer from your homepage by clicking the pen icon next to their name and clicking 'Delete Dealer'.

.png)
Adding Items to the Basket and Completing a Sale
-
Adding an item to your basket
-
Adding multiple items to your basket
-
Charging a customer
Adding an Item to your basket
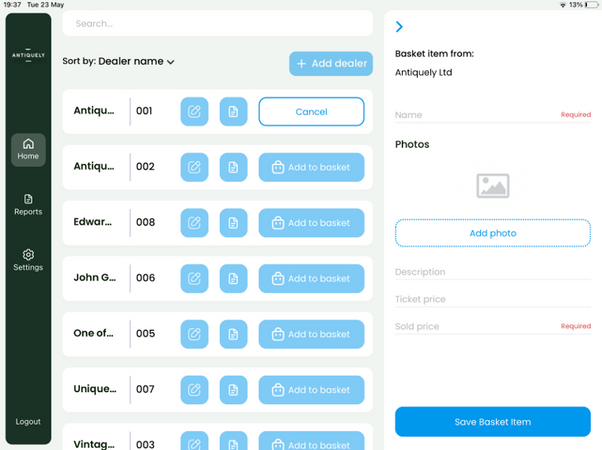
To add an item to your basket you need a subscription to the Essentials plan. Once you have signed-up via the settings page you can add an item to the basket by searching for the relevant dealer or vendor and selecting the ‘Add to Basket’ button next to the dealer name.
A window will appear where you can enter the details of the item. The two fields that must be completed are ‘Item Name’ and ‘Sold Price’. The others are optional to help the dealer identify the sold item and see the discount applied from the ticket price. Once you have entered the relevant details click the ‘Save Basket Item’ button.
Adding multiple items to your basket
You can add multiple items to the basket, from the same or different dealers. Once you have added an item to your basket you can stay in the same dealer and enter another item from their unit by clicking the ‘+ New’ button. Or you can add an item from another dealer by searching for a new dealer and clicking the ‘Add to Basket’ button next to their name.
Once a new item is added you will see a list of items in the basket including which dealer they are from and a total basket value.
Charging a customer
Once you have added your items to the basket a total will be shown at the bottom of the basket. Click ‘Charge’ and you will be prompted to ask the customer if they will be paying by cash or card with the total basket value shown below. Take their payment before pressing ‘Charge’ to finish the payment process.
Reading and Using Sales Ledger Reports
-
Admin Account Sales Ledger Report
-
Dealer Sales Ledger Reports
Admin Account Sales Ledger Report
By navigating to the report tab you will find the sales ledger report for your Antiquely account. Use the pre-set date toggles or input custom dates to adjust the timeframe of the report.
Day = the current calendar day starting at 00:01 that day
Week = The current week commencing 00:01 on the previous Monday
Month = The current month commencing 00:01 on the 1st of the current month
Once the date range has been selected you will see a list of the items sold in this time period and their relevant details ordered from newest to oldest. The totals at the bottom of the report will also reflect the time range, the report shows a total for cash sales, card sales, and total sales in the time period.
Dealer Sales Ledger Reports
You can access individual dealer reports by clicking on the report icon next to the dealer’s name on the homepage.
In the dealer report you will see a list of sales attributed solely to the dealer selected. Use the preset date toggles or input custom dates to adjust the timeframe of the report.


Managing and Receiving Email Reports
-
Dealer/Trader email reports
-
Admin Account email reports
Dealer/Trader email reports
You can opt to send email reports to your dealers/traders by navigating to the settings tab from the homepage and switching the toggle next to 'Send dealer reports' to 'on'. You can manage the frequency of these reports using the drop down next to 'Dealer report frequency' and selecting daily, weekly, or monthly.
If an individual dealer would like to opt-out of reports you can do this by finding the relevant dealer on the homepage and clicking the edit dealer icon. Switch the toggle next to 'Auto Reporting' to off and click the 'update dealer' button.
If a dealer has no sales recorded they will not receive a report.
Admin Account email reports
The email address used to set-up your Antiquely account will receive reports on behalf of the store. They will receive two types of report:
-
Sales Ledger Reports - a list of the items sold for the day/week/month depending on the frequency selected in the settings tab. These reports contain a list of sales showing the dealer name, item name, date, payment type, sold price, commission, and a link to any images attached to the item.
-
Weekly and Monthly Dealer Summary Reports - a summary report of sales by dealer/trader will be sent every Monday showing the previous weeks sales, and the 1st of every month showing sales for the previous calendar month.
Adding a Security Pin and Enabling Admin Mode
-
Adding a Security Pin
-
Enabling Admin Mode
Adding a Security Pin
You can choose to limit access to certain areas of the app by adding a security pin. To do so, navigate to the Settings tab where you will find a field called 'Admin mode -pin'. Click on the field and you will be prompted to enter a 4 character pin, it can be alpha-numeric. Once entered, click 'save'.
You will now be prompted to enter your 4 character pin for the following tasks:
- Adding a new dealer
- Updating and editing dealer information
- Viewing the reports tab or dealer reports
- Viewing and updating the settings tab
Enabling Admin Mode
Once you have added a security pin in Settings an 'Admin mode' icon will appear on the bottom left of the app. When this is toggled to 'on' you will be prompted to enter your 4 character pin, you can now navigate all areas of the app, switch the toggle to 'off' to restrict access again. Admin mode is enabled for a limited time, if you do not use the app Admin Mode will toggle to 'off' automatically after 90 seconds.

_edited.png)